Showing posts with label fabric. Show all posts

Tuesday, April 1, 2014

Chalk Paint® on Fabric Chairs


One of my clients needed immediate help making her two vintage chairs presentable for houseguests coming to stay with her in a week.  She did not want the expense of reupholstering the chairs and she did not have the time to get it done before the houseguests arrived.  

I suggested she try painting the fabric on the chairs with Chalk Paint®, so she hired me to come out and give it a try! 


She found these solid, well-built chairs at an antique shop. She loved the size and shape, but had always planned on replacing the fabric, which was a heavily stained, pale yellow linen.  


I used Old White on thechair fabric and Pure White on the legs. The Chalk Paint® covered the fabric, making the chairs look brand new!


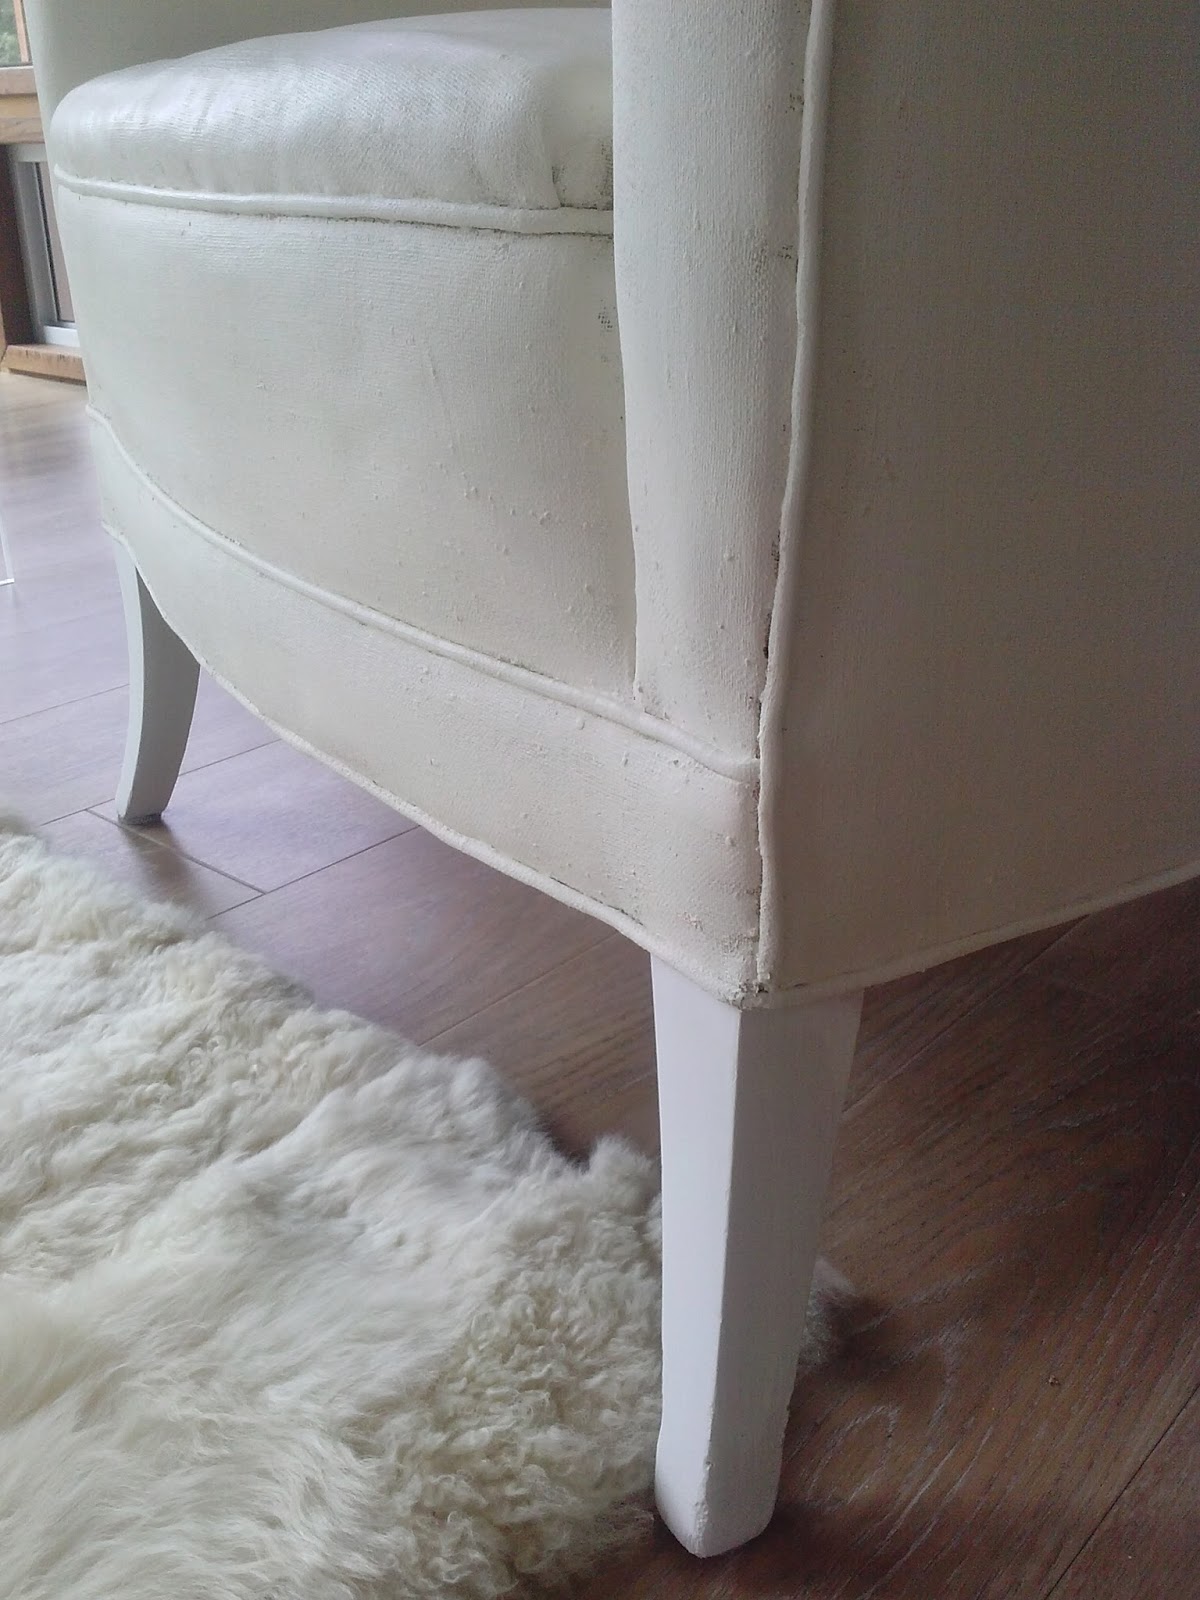
You can even see the texture of the linen through the paint.


It was a time consuming process, but definitely worth it in the end.  I painted the first coat with Old Ochre Chalk Paint®, but after I got it on the chairs, my client decided she wanted the fabric to be lighter, so I painted the next two coats of paint with Old White. I applied a total of three coats of Chalk Paint® sanding the entire chair with 220 grit sandpaper, on a sanding block, between each coat.  I used a damp cloth to remove all the dust from sanding between coats.  The sanding made the fabric feel smooth and soft and removed any crusty areas. After the third coat of paint dried, I applied a coat of Annie Sloan clear wax to seal and protect the fabric.  


It does not look like the fabric is painted and it feels soft and durable.

Thursday, December 29, 2011

Butterfly Bench


Last time I visited my sister in Southern California, I found this vanity bench at a yard sale for a few dollars.  It was one of those days when I did not find anything all day until I snatched up this petite bench at the last sale of the day. 

I forgot to take a before picture, but with a little luck, I found a picture of the exact bench on a google image search. 


I painted the legs with Aubusson Blue Chalk Paint and applied clear and dark wax over the paint. 


I added a double layer of new foam for the seat cushion and upholstered it with linen, butterfly fabric.

My local fabric shop just got this fabric in stock and I love the butterflies paired with fancy scripts and stripes.


This post is linked to the parties on my sidebar.

Friday, October 7, 2011

Paris Script Bench


I love to redo benches and I was happy to find this vintage one at the Santa Cruz Flea Market a few weeks ago.  


The old finish was scuffed up and, as you can see, the seat cushion was pretty disgusting.  The man I bought it from told me that the night before he had a dream that his old bench had become beautiful.  Well, I suppose his dream was about to come true.


I removed the old fabric and cushion first and then painted the bench.  I painted it with a gorgeous grayish-brown color that Nancy made by combining paints.


I bought new foam for the seat and I used some leftover Paris Script fabric, from another bench I fixed up, to recover the cushion.  


I wish the man from the flea market could see his old, ugly bench now.


This post is linked to the amazing parties on my sidebar.

Thursday, September 29, 2011

Stenciled Slipcovers for Parsons Chairs and Stencil Giveaway!


I had a pair of Parsons Dining Chairs from my old house that I wanted to get rid of.  I decided to make slipcovers for them and sell them at Loot.  Laura from Maison De Stencils sent me a stencil as a gift and this seemed like the perfect project for my new stencil.  Maison De Stencils have the most unique and stylish stencil designs.  Laura is also offering one of my reader's a 12 x 12 stencil of their choice.  Keep reading for all the details!


Luckily I had the old slipcovers, so I disassembled them to use as a pattern for my new slipcovers.  I used painter's drop cloth as the fabric.  Once I cut out the pieces, I pinned the top, back and seat pieces together.


I folded the corners and pinned them in place before sewing.


I sewed the front and back pieces together first and then sewed the seat on.  Last, I pinned and sewed the skirt, pleated at each corner. 


Next came the fun part; using my new stencil!  I mixed my brown fabric paint with white to tone it down a little.  The stencils from Maison De Stencils are so easy to use and the designs came out perfect and clear.


Isn't this stencil beautiful?  The stencil really dresses up these, otherwise plain, slipcovers.


These parsons chairs look fabulous on either side of a buffet.


They also work perfectly as two end chairs at a dining table.


I have never made a slipcover for a chair before and they were definitely a challenge for me to sew.  I even broke my seam ripper at one point and had to run out and buy another one half-way through this project.  The second chair was easier than the first because I avoided all the mistakes I made the first time.  I can tell you that it was a big relief when I finally finished them and took them to the shop.


To see other projects I have done with stencils from Maison De Stencils click on the links below:

Now, on to the giveaway, so you can make your own lovely, stenciled project!  

Please follow these rules to enter the stencil giveaway.

1. Become a follower of my blog
2. Go to Maison De Stencil's website and pick out your favorite 12 x 12 stencil.
3. Leave me a comment telling me which 12 x 12 stencil you want, if you win.
4.  For a second entry, post this giveaway on your blog. Leave me another comment letting me know you did this.
5. For a third entry, post this giveaway on your facebook page.  Leave me separate comment for this too.

Good luck, lovely blog readers!  I will be picking a winner, using the random number generator, on Oct. 10th.  


This post is linked to the amazing parties in my sidebar.

Wednesday, August 24, 2011

Antique Piano Bench


I found this antique piano bench at a yard sale for only $3.  Unfortunately, I forgot to take before pictures.  When I found the bench, it had a dark reddish brown stain and a dirty needlepoint cushion cover.  One of the sides had a crack in it too.  My handy dad repaired the crack with a little wood glue and a long pony clamp.


I painted the bench with Old White Chalk Paint and applied clear and dark wax over the paint. When I started to paint the first coat of Chalk Paint, the original finish came off and was turning my brush pink.  I had to stop and use primer before finishing it with Chalk Paint. I left the little brass feet as they were.  


The original foam on the seat was old and disintegrating so much that when I first lifted the seat up, the storage compartment was filled with orange powder. I bought new foam and reupholstered the seat with fancy, Paris script fabric.  

This is one of my items that sold at Loot this past weekend!


This post is linked to the parties on my sidebar.

Sunday, August 14, 2011

My Bedroom


I know I have been MIA lately, but that is because I am in Pittsburgh visiting my brother and his family.  I have had a great time in this beautiful, lush and green part of the country.  I am heading home in a few days and, while I have had a wonderful time here, there is nothing like being back in my own bed.

I took these pictures of my room a few weeks ago. I live in a small cabin in the redwoods and besides the giant trees blocking a lot of sun, the room also happens to very small, making it doubly hard to photograph.  I captured as many angles as I could.


I found this vintage dresser on sale at an antique shop a few years ago.  I love the crystal drawer pulls and the little keyhole in the top.  I found the vintage, crystal lamp at an estate sale and recovered this lampshade. 


The antlers, antique books and white pitcher all came from yards sales. I made the curtains with Michael Miller damask fabric and sewed pom pom trim to the edges. 


Remember the cute, candle chandelier I fixed up earlier this summer?  I decided to hang it over my bed.


My favorite part of the room is the exposed wood ceiling and the large picture window overlooking the deck.  When we sleep with the window open, we are lulled to sleep by the sound of the creek below.


 I made the dream banner with some left over burlap and my vintage brass stencil letters. And remember this antique foot board I fixed up a while ago?  It works great as my head board now.

I am looking forward to being back home and sleeping in my own bed in a couple of days!

Tuesday, May 10, 2011

Tutorial Tuesday: Fabric Covered Bulletin Board


I have a lot of vintage frames, from yard sales, and many of them do not have any glass or backing.  I already made chalkboards with some of them and this time I decided to try a bulletin board covered with fabric.  


I found an old bulletin board at a yard sale this past weekend for $1, that was the big enough for one of my large, vintage frames.  Mr. Rubbish took it out of the frame and trimmed the board down with his jigsaw to fit my vintage frame perfectly.  I know you can buy cork board in rolls at craft stores, but I prefer to buy used, when I can. 


To cover the cork board with fabric, just pull it over the board tightly and staple it to the back with a basic staple gun.  So easy!  

Do you remember the Paris map fabric that I used to reupholster this bench?  I originally bought this fabric to recover a chair for my Parisian friend, Jenni.  The chair frame got warped and I could not fix it, so I made her this bulletin board instead.  

I painted the frame black and distressed the edges before putting the fabric-covered cork board inside.  

You can glue or nail the bulletin board to the frame.  I just took mine to a frame shop and had them attach it for me.  It took them about two minutes and it only cost me a few dollars.


This post is linked to:


Tuesday, October 12, 2010

Vintage Crewel Fabric Pillows

I have been kind of obsessed with vintage crewel fabrics lately. I love the 3-D effect of the chunky embroidery on a linen background. They usually have interesting and colorful floral patterns too. I decided to dress up my living room with a few crewel pillows. I already had the feather inserts, so I used the crewel fabric to make removable covers.

The first pillow came from a vintage Romann & Stroheim fabric sample (sad there was only enough for one pillow) that I purchased on ebay for $.99 plus shipping! It came with another sample that I did not like as well. What a deal! They were so cheap because some of the dye from the embroidery had bled onto the linen. I figured, for a dollar, it was worth a try and the dye came out when I laundered them with a little stain stick. I backed the cover with some plain linen and made ties for closure on the back.


I made two more pillow covers with vintage crewel fabric sold by the yard on ebay. I only needed one yard for the two pillows, so it did not cost me too much. I added some pom pom trim for the edging and an envelope closure on the back. I love the moss green linen backround of this fabric.


See what I mean about the vintage crewel embroidery? Isn't it gorgeous?


This post is linked to:


LinkWithin

Related Posts with Thumbnails