Thursday, October 28, 2010

Laundry Finds

I live in a small cabin in the woods with no laundry room. That means I have to go down the road to the laundromat to wash my clothes (something I have not done since college). One nice thing about it is that on laundry day, every last bit of dirty laundry gets a fresh start. I love hanging most of my clothes to dry outside on a clothesline and I found this vintage clothesline at a moving sale. I saw it in the backyard and when I asked them how much, they said they had forgotten they even had it. I got it for only $10 and it saved Mr. Rubbish from having to build me a clothesline.


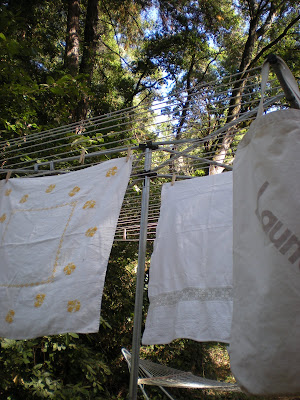
At another estate sale in Carmel Valley (great place for estate sales), I found this vintage laundry bag (love it!) amongst a pile of linens in the master bathroom. I heard envious gasps from the line behind me when the other women saw what I found. That is what I get for always spending so long digging through old linens. It was a very expensive estate sale, but I managed to find all the cheap items in the house. I think I paid $2 for the bag. It is perfect for taking my clothes to the laundromat in style!


This gorgeous, embroidered, linen tablecloth came from another yard sale and it only cost me $1. It is in flawless condition and the linen has a nice slubby texture.


I love having a place to hang my laundry outside. It is very therapeutic for me to spend time in nature while hanging my clothes to dry. It reminds me of being a little girl and standing outside with my grandma, handing her clothespins from the bag, as she hung her clothes on the line in the warm sunshine. My grandma had a dryer at that time, but she used it soley for storage as she preferred the old-fashioned way of drying her laundry.

Tuesday, October 26, 2010

Tutorial Tuesday: How to Sew a Ruffle

While this tutorial may be too basic for most of you, I figured there may be some readers that do not know how easy it is to make a ruffle. Since I like to use ruffles frequently, I wanted to create a step-by-step ruffle tutorial today.

Step One: Start by cutting your fabric into strips of your desired width. The length of the strip should be 2-3x the length of the fabric you are attaching the ruffle to because it is going to lose length when you gather it.


Step Two: Loosen the thread tension on your machine and sew two straight stitches, close together, near one edge of the the fabric strip.


Step Three: Turn the fabric over and find the bobbin threads. Hold onto the bobbin threads as you pull the fabric to gather it.


Step Four: To attach the ruffle to your fabric, simply sew the right sides together. You can pin it in place, removing the pins as you sew.


Now you are prepared to dress up all your home accessories with ruffles!

Friday, October 22, 2010

Turquoise Faux Rococo Shelf

This little shelf came from a yard sale where everytime I asked the woman, "how much?", she would say one dollar. Some of the stuff was probably worth a buck, but some of the things were worth a lot more. It did not matter to her because as far as she was concerned, it was all a dollar. It was like the dollar store of yard sales!


I painted the shelf with a couple of coats of turquoise craft paint.


This is what it looked like after two coats of paint. Better than before, yes, but still boring and doing nothing to bring out the scrolling details.


I turned to my old favorites, Ralph Lauren tobacco glaze and antique gold Rub 'n Buff, to bring out the details and add a little interest and depth to this piece. I think they worked their magic!


A shelf worthy of its (faux) Rococo title!


This post is linked to:


Thursday, October 21, 2010

Brass Candlesticks Revived in Aqua

This old pair of brass candlesticks came from the same attic sale as this pair. They had been sitting out in the rain and were discolored and splotchy when I came to their rescue. I am sure they would have been destined for the trash, if I had not come along at the right time.


I love thier shape and thier tall stature. After painting on the Bullseye prmer, I painted them gray and they just looked kind of bland to me. So...I mixed some turquoise and cream craft paint to make a creamy aqua color. I gave it a couple of coats and distressed the edges.


Ahh...Much better!

Monday, October 18, 2010

Mini Lamp Shades Transformed

I have a wall sconce for sale at the boutique that I purchased at a yard sale with two mini shades for $5. When I bought it, it was black iron, but Mr. Rubbish spray painted it heirloom white for me (before he quit). I added a glaze that I made by mixing some brown acrylic paint with water and then distressed it. This wall sconce was one of the first items that I took to the shop. Recently, a customer bought the two mini shades on the sconce for a light she had at home. My poor wall sconce was left naked.

It does not look very pretty here. I am sure it does not help that the wall color looks exactly the same as the color of the sconce.

Luckily, I had two crystal-trimmed, yet plain, shades from another garage sale that I decided to recover in the same cabbage rose fabric that I used for this rectangular shade. I find it easiest to cut and glue each section for these wire lamp shades, otherwise it is difficult to keep the pattern straight. The cylinder shades are definitely easier and less time consuming because you just have to glue one piece around. I used a linen-colored trim for the top and bottom and covered the seams with folded fabric strips.


Here they are - perfect for my wall sconce and hopefully for a new home soon!


This post is linked to:


Tuesday, October 12, 2010

Vintage Crewel Fabric Pillows

I have been kind of obsessed with vintage crewel fabrics lately. I love the 3-D effect of the chunky embroidery on a linen background. They usually have interesting and colorful floral patterns too. I decided to dress up my living room with a few crewel pillows. I already had the feather inserts, so I used the crewel fabric to make removable covers.

The first pillow came from a vintage Romann & Stroheim fabric sample (sad there was only enough for one pillow) that I purchased on ebay for $.99 plus shipping! It came with another sample that I did not like as well. What a deal! They were so cheap because some of the dye from the embroidery had bled onto the linen. I figured, for a dollar, it was worth a try and the dye came out when I laundered them with a little stain stick. I backed the cover with some plain linen and made ties for closure on the back.


I made two more pillow covers with vintage crewel fabric sold by the yard on ebay. I only needed one yard for the two pillows, so it did not cost me too much. I added some pom pom trim for the edging and an envelope closure on the back. I love the moss green linen backround of this fabric.


See what I mean about the vintage crewel embroidery? Isn't it gorgeous?


This post is linked to:


Friday, October 8, 2010

Vintage Office Chair Redo

When we moved into a house we were renting a couple of years ago, I found this vintage, solid oak office chair in the basement, left by the previous tenant. The chair, besides cosmetically (the finish was scratched and I am not crazy about orangish oak), was in great condition. It is very comfortable, well-built and it swivels and rocks. When we moved, Mr. Rubbish begrudgingly loaded the chair in the moving truck for me. I knew that someday I would paint it and bring out its true beauty. I just could not pass up a free chair with so much potential. I mean, they sell a near exact replica at Pottery Barn for a whopping $399 if you can believe it?!!


Well.... I finally painted it! I had Mr. Rubbish bring it out of our storage unit last week and I got to work. First, I sanded it with an electric palm sander and then painted on primer. Two coats of cottage white and a bit of distressing later and I have a new shabby chic, office chair! I do want to keep it in case I ever have a home office again, but I think it is going to the shop.


Here is the armless version of the chair in a Pottery Barn ad. They also sell one with arms that looks almost identical to my vintage one.


This post is linked to:


Wednesday, October 6, 2010

Mid-Week Design Inspiration: Outdoor Spaces

Happy Fall!!!!!
Country Living Magazine

With summer just leaving and the crisp, autumn air arriving, I wanted to take a look at all those lovely outdoor spaces that can still be enjoyed a bit longer before winter creeps in.

This patio is just magical with vines growing everywhere and the outdoor fireplace.

Country Home Magazine

I love the cheery colored, paper lanterns hanging from the rustic patio cover.

Lonny Magazine

I think this one is every girl's dream patio complete with the crystal chandy!

Country Home Magazine

How about this for outdoor fine dining? I love all the candlelight and the vintage metal chairs with mismatched cushions.

House and Garden Magazine

This cottage setting is absolutely charming with the bistro table, cobblestones and overflowing window box!

Country Home Magazine

I simply love old farmhouse porches. I don't know why, but this one makes me miss summer the most... or maybe it just makes me miss the simplicity and authenticity of a way of life that rarely exists anymore.

Country Home Magazine

This dramatic buogainvillea covered patio belongs to Suzanne Somers. Lovely!

lesbauxdepalmsprings.com

I hope you can all get out and enjoy your special outdoor spaces and breathe in the fresh fall air!

Monday, October 4, 2010

Paris Apartment Inspired Accessories

Take a look at Betsy Johnson's New York "Paris" apartment courtesy of Apartment Therapy. It is sooo pink! It is a little too much, but it is so girly and I love it. My tween niece, Sophie, is decorating her bedroom in Paris apartment style too and it inspired me to work on some pink and girly home accessories today.

I picked up these weathered brass candlesticks at an attic sale for $1 and they had seen their better days.


I wanted to give them a romantic and feminine makeover. After primering, I painted them the palest pink and rubbed all the edges with antique gold rub 'n buff. I finished each by gluing on a vintage, pearl and gold button cover.


These wooden plaques were 5o cents at a thrift shop and I have held onto them for a while, not sure what would become of them. I painted them with white and pink stripes and then stenciled a black fleur de lis in the center. I sanded the surfaces to distress them and then used dots of glitter paint to accentuate the fleur de lis. Mr. Rubbish screwed on white hooks for me and they are ready to be hung in a Paris apartment style room. I think they will be perfect for Sophie's new bedroom!


This post is linked to:


LinkWithin

Related Posts with Thumbnails