Thursday, September 29, 2011

Stenciled Slipcovers for Parsons Chairs and Stencil Giveaway!


I had a pair of Parsons Dining Chairs from my old house that I wanted to get rid of.  I decided to make slipcovers for them and sell them at Loot.  Laura from Maison De Stencils sent me a stencil as a gift and this seemed like the perfect project for my new stencil.  Maison De Stencils have the most unique and stylish stencil designs.  Laura is also offering one of my reader's a 12 x 12 stencil of their choice.  Keep reading for all the details!


Luckily I had the old slipcovers, so I disassembled them to use as a pattern for my new slipcovers.  I used painter's drop cloth as the fabric.  Once I cut out the pieces, I pinned the top, back and seat pieces together.


I folded the corners and pinned them in place before sewing.


I sewed the front and back pieces together first and then sewed the seat on.  Last, I pinned and sewed the skirt, pleated at each corner. 


Next came the fun part; using my new stencil!  I mixed my brown fabric paint with white to tone it down a little.  The stencils from Maison De Stencils are so easy to use and the designs came out perfect and clear.


Isn't this stencil beautiful?  The stencil really dresses up these, otherwise plain, slipcovers.


These parsons chairs look fabulous on either side of a buffet.


They also work perfectly as two end chairs at a dining table.


I have never made a slipcover for a chair before and they were definitely a challenge for me to sew.  I even broke my seam ripper at one point and had to run out and buy another one half-way through this project.  The second chair was easier than the first because I avoided all the mistakes I made the first time.  I can tell you that it was a big relief when I finally finished them and took them to the shop.


To see other projects I have done with stencils from Maison De Stencils click on the links below:

Now, on to the giveaway, so you can make your own lovely, stenciled project!  

Please follow these rules to enter the stencil giveaway.

1. Become a follower of my blog
2. Go to Maison De Stencil's website and pick out your favorite 12 x 12 stencil.
3. Leave me a comment telling me which 12 x 12 stencil you want, if you win.
4.  For a second entry, post this giveaway on your blog. Leave me another comment letting me know you did this.
5. For a third entry, post this giveaway on your facebook page.  Leave me separate comment for this too.

Good luck, lovely blog readers!  I will be picking a winner, using the random number generator, on Oct. 10th.  


This post is linked to the amazing parties in my sidebar.

Tuesday, September 27, 2011

Vintage Chair and Frame Chalk Paint Transformations


I bought this cute, vintage chair and ornate frame from an estate sale recently.  


The chair had a very dark stain and the seat was upholstered in black leather.  It looked like it had never been used. Although it was in perfect condition, it still needed an updated look.


I chose the Duck Egg Blue chalk paint for a complete transformation.  I love the little cutouts on the back of this chair and the shape of the legs.  The Duck Egg Blue really brings out this chair's best features!


I went to the local fabric store and I could not find any fabric I liked with the Duck Egg Blue.  I wanted the chair to be the focus, so I didn't want anything too bold or busy.  Nancy suggested that I just use burlap.  I was not sure at first, but after I got the whole chair put together I was convinced that was the right fabric choice and the chair sold the first day of our sale.


 I love large oval frames and this one has beautiful detailing.  It has chips and hairline cracks, but I think it adds to the chippy charm.


I painted it in Country Gray Chalk Paint with dark and clear waxes.  I sanded it to allow some of the gold to show through.


This large, ornate frame would be perfect as a chalkboard, but it also looks great as it is. 

This frame is for sale in my etsy shop!


This post is linked to the fabulous parties in my sidebar.

Monday, September 26, 2011

Paris Gray and White Vanity

This gorgeous vanity came from an estate sale.  It was my big piece at the Loot sale and I am thrilled it sold the first day!  It sold to a darling 14 year old who wanted it for her bedroom.  She came into the shop in the morning and fell in love with it, but her dad wasn't convinced.  She came back just before we closed for the day and he bought it for her.  What a nice dad!  I am delighted that this vanity went to loving home.


This is what it looked like when I found it:


The finish was a little worn in places, but nothing a little Chalk Paint could not fix. This vanity is extremely well-built and heavy.  I broke a sweat when I helped Mr. Rubbish carry it to and from the truck, even with the drawers removed.


It came with a gorgeous, beveled mirror with a beautiful applique on top and a beaded trim along the edges.


I envisioned this vanity being very pale, but I wanted to highlight the applique and detailing around the drawers.  I thought the Paris Gray Chalk Paint was too dark for this piece, so I mixed it half and half with Old White Chalk Paint.  The color became the gorgeous, subtle gray I had envisioned.  


I used the Old White Chalk Paint on a tiny paint brush to paint the trim around each drawer.  I also painted the trim around the mirror and the applique on top with Old White.


I also used the Old White Chalk Paint, thinned with water, to create a whitewash on the existing drawer hardware.


My only advice for mixing paint is to either mix enough paint to complete the job or measure the ratio of each color exactly.  I ran out of paint and I still had to do one more coat on the top of the vanity.  It took too many attempts to get an exact match of color.  I finally did it, but it would have been much easier had I mixed enough paint to start with.  What project is ever complete without one or two mishaps along the way?  I am very pleased with how the vanity turned out in the end!


This post is linked to the parties in my sidebar.

Saturday, September 24, 2011

September Flea Market at Loot


Here is what the front room looks like now at Loot.  I will do a post on the stenciled, parson's chair slipcovers next week.  


Nancy added some festive, autumn touches to our decor.


I picked up this antique writing desk at an estate sale recently.  Normally, I am a bit of a paint addict, but Nancy convinced me to leave this one as it is.  It is a unique piece and I love the way the legs crisscross.


We have lots of new items for the garden too!


Today was a little slow, but we still sold a lot and I we are hoping tomorrow's sale is even better.  If  you are in the area, stop by tomorrow between 9 and 4.  

Loot
3011 Main St.
Soquel, CA

Thursday, September 15, 2011

Handmade Wood Stain: Vinegar and Steel Wool


I picked up this two-tiered, vintage table at a yard sale a long time ago and it sat in my living room for too many months, as I tried to figure out if it was worth fixing up.  Sometimes I would stare at it and brainstorm what I could do with it to make it attractive.  I even considered taking the top off, so that it would just be a normal, side table with cute, turned legs.  


Ultimately, I decide to go with a farmhouse style refinish for this little, out-dated side table.  I had been researching old-fashioned, non-toxic stains and finishes, so I decided to give one of the recipes a try.  


I started by completely removing the ugly, orange finish using my palm sander.  Underneath was just very light wood.


I mixed apple cider vinegar with grade 0000 steel wool in a mason jar with a tight lid.  I let the concoction sit for a few days to give the steel wool time to start dissolving.  The woodworking site stated that apple cider vinegar works better than regular vinegar for this finish, so that is what I used.  It also said that you could put rusty nails in with the steel wool.  I didn't have any on hand, so I just stuck with the steel wool.  I read that different wood turns different colors with this finish, so I wasn't sure exactly how it would turn out.


 I used a foam brush to apply the mixture to the bare wood. 


It got quite a bit darker instantly and, after soaking in, it darkened even more.  After two coats, it turned a kind of smoky-brown color.  I really enjoyed using this stain and it was much easier to work with than traditional, oil-based stains because it went on so smoothly and evenly.  The best part about this old-fashioned finish is that there are no toxic fumes like with the oil-based stains.


I used Country Gray Chalk Paint to paint over the orange finish on the legs and spindles of the table and then distressed them.  I waxed the tops of the table with Minwax Paste Wax to protect the finish. 


My miniature, farmhouse table transformation is complete!


This post is linked to the parties on my sidebar.  

Monday, September 12, 2011

Beachy, Chippy, Chalk Paint Table


Last Friday I found an estate sale on Craigslist that sounded perfect, but Craigslist ads can be deceiving and you never know until you see it in person.  I have been to plenty of "estate sales" that turned out to be just plain old garage sales.  This one was the real deal!  I went Friday morning and spent at least an hour looking through the house and patio and the best part was that I was the only shopper there the whole time!  I got to take my time and I got great deals!  I found a lot of amazing pieces including this vintage, handmade patio table, that looks right at home inside now.


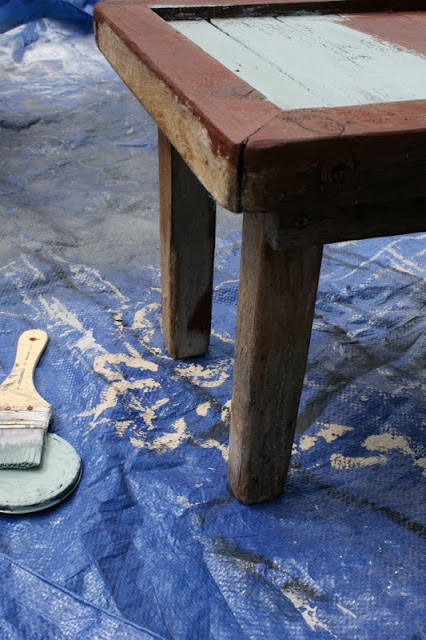
I was not sure what to do with it when I bought it, but I liked the style and the price.  It was stained with that typical, red, picnic table finish on top.


The legs had some kind of old stain on them that was chippy and peeling off in places.


I decided to take advantage of the weathered wood and existing finish by lightly dry brushing the Chalk Paint on, allowing all the lovely chippy parts and red paint to show through in places.


I dry brushed duck egg blue Chalk Paint on the top, which reminds me of an old shutter now.


For the legs, I used Old White Chalk Paint.  Look at the lovely chippy finish on the legs!


The Chalk Paint looks like the original, weathered paint.  I am so pleased with how it turned out and my only regret, which I hate to admit, is that I did not buy the matching larger version of this table.  At the time, I did not know that it was going to look this good, so I just bought the small one.  I am kicking myself because the larger one was a perfect coffee table size.  I went back on Saturday, but it was already sold. I am so disappointed... at least I have this little one to console me.


This post is linked to the parties in my sidebar.  

Friday, September 2, 2011

Pair of Paris Gray Side Tables


I picked up these matching side tables at a local thrift shop on their half-off day.  They were rather plain and boring, but the price was right and I figured I could do something to make them more appealing.  


I decided on two-toned paint for this pair.  I used Paris Gray and Old White Chalk Paint, but the tables still looked too plain and boring to me.


In order to create some character for these plain Janes, I decided to add a design to the drawers and bottom part of the tables.  I found a simple, flower stencil at the craft store that fit on the drawers perfectly.


Now the Plain Janes are not so plain!


This post is linked to the parties in my sidebar.


LinkWithin

Related Posts with Thumbnails