Thursday, April 28, 2011

My Mom's Shabby Kitchen Table


Last time my parents came to visit me, we went shopping in Pacific Grove and they bought this table from Blessings Boutique.  My mom loved the vintage table, but when they bought it, the table had a weird kind of distressed finished with what looked like blotchy spray paint.  I told my mom to just paint it white and we cold distress the edges when I visited her.

Unfortunately, I do not have a picture of the table before, but here is what it looked like after my mom gave it a fresh coat of white paint.

I am visiting my parents right now and we decided to work on her table in between upholstering some chairs.  My mom has a nice pneumatic staple gun, so I am getting my difficult upholstery project done while I am here too.

Here is what the table looks like now, after my mom and I distressed the edges and applied a paste wax.

The tabletop is so pretty with a little distressing and reminds me of a shabby, old door.  She is collecting small, vintage chairs to go with the table and we are going to paint and reupholster them next.


The cool thing about her table is that both sides fold down to save space.  This table is actually for my mom's kitchen (I took the pictures in her dining room), where she does not have a lot of space, so it is perfect!  


I found stuff my mom had lying around her house for a centerpiece - some seashells, a silver tray, candles and bud vases holding some pretty desert weeds.


This post is linked to:


Tuesday, April 26, 2011

Find of the Week: Vintage Cane Back Chairs


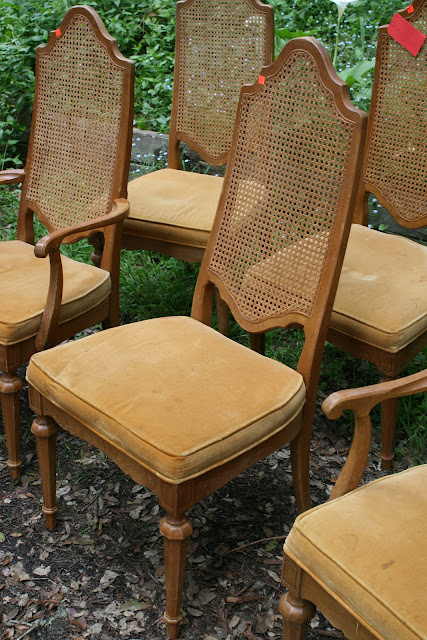
On Saturday, while I was out looking for yard sales, I passed a sign for a little thrift shop, advertising a store-wide 50% off sale.  I stopped in, to see what I could find, and spotted these fabulous, vintage, caned dining chairs! There was a full set of six chairs and they were priced at ten dollars apiece.  With the 50% discount, I got all six chairs for only thirty dollars!


I do not really need another project right now and I was not looking for chairs, but I could not pass up these beauties.  They are all in nearly perfect condition and there are no holes in any of the caning!


All they need are new finishes and upholstery.  I have to complete a few projects before I can start revamping these chairs, but I am really looking forward to starting their transformation.


This post is linked to:


Sunday, April 24, 2011

Happy Easter


I hope you are all having a restful and wonderful Easter Sunday!


I cut some spring blossoms from a beautiful tree by my house.

My sister, Emily, bought me this large artichoke at a yard sale.


I painted it white, distressed it all over and glazed it for a shabby look.


Thank you Emily! I love it!


I picked up this old frame at a yard sale.


I painted it white and made a chalkboard for it.


Happy Easter!!!


This post is linked to:


Tuesday, April 19, 2011

Old Crate and Candle Wall Sconce


I found many great items at yard sales on Saturday, but this vintage crate is my favorite!  I found it at the last yard sale of the day and it was only $2.  The man I bought it from said that his family told him to just throw it away, but he thought someone would want it.  Well, I am glad he saved it and glad I found it!

There are so many uses for these lovely, old crates. I think I will use this one under my coffee table to hold some books and magazines. Click here to see the other large crate that I made into a side table.


The really unique thing about this old crate is that it folds up!


I love the weathered wood, rusty hinges and worn, stamped lettering.


 I also found this vintage, brass wall sconce with a French bow on top.


I primered it first and then painted it at the same time as the chalkboard frames.  I painted it aqua, applied a glaze, and finished it with my favorite accent, Gold Rub 'N Buff.


I love painting old, brass candle holders and lamps because it changes the look so much.


This post is linked to:


Monday, April 18, 2011

Chalkboards in Vintage Frames


I had several vintage frames laying around and I decided to make a few chalkboards to go inside them.  I bought some sheets of thin, smooth wood from Home Depot and Mr. Rubbish cut them down to the sizes that fit my frames.  I primed the wood and then painted four coats of chalkboard paint over it, sanding with fine grit sandpaper in between coats.

This vintage frame used to house a wild turkey print. It was dark and outdated, but I liked the distressed wood.


I painted the frame white and sanded the edges before attaching the chalkboard with wood glue.


I love the fancy, scrolling details of this Syrocco style, vintage frame.  


The frame was originally gold and black and had an old print with red, velvet trim. I removed the velvet border before making it into a chalkboard. This frame did not come with glass, so it was a perfect choice for a chalkboard.


I painted the frame a pretty shade of aqua, glazed it and applied gold Rub 'n Buff over all the edges and raised details.  


I painted the two small, vintage frames aqua and took them to the shop yesterday to help me advertise the sale in my booth.


Chalkboards are an ideal project for empty vintage frames, especially the ones that do not have glass.


This post is linked to:


Thursday, April 14, 2011

Plant Stand + Pizza Stone = Cute Side Table


I was outside looking through my own pile of rubbish the other day when I suddenly got an idea.  I saw my old pizza stone and a plant stand and I thought they would make a perfect little table if I attached the stone to the top of the plant stand.  

Pizza Stone
Plant Stand

After painting them both a pale green, I attached the pizza stone to the top of the plant stand with E6000 glue.  Then, I traced the top of the table onto a pretty piece of paper from the art supply store.


I cut out the paper and decoupaged it onto the top with Mod Podge.  When it dried, I gave it two more coats of Mod Podge to seal and protect the surface.


I painted the entire thing with a coat of light brown glaze and rubbed it off with a rag to give it an aged look.


I love the birds, fancy scripts and stamps on this pretty paper.


This was such an inexpensive, easy project and I am happy that I was able to reuse two things I did not want anymore to make it.


This post is linked to:


LinkWithin

Related Posts with Thumbnails