Showing posts with label crafts. Show all posts

Wednesday, December 14, 2011

Sheet Music Christmas Tree


Nancy and I had craft night at Loot last month and started making some ornaments for a little silver tree at the shop.


We made these star ornaments with a package of various sized, wooden stars from the craft store.  We stamped them with a fancy script stamp and added glitter to all the edges.  Then, we drilled tiny holes and attached a pearl to the top of the star and a crystal to the bottom.


I found these empty glass ball ornaments at a yard sale for 50 cents.  I cut strips of my vintage sheet music and stuffed as many as I could fit inside each one.


I attached some simple, sheer ribbon to each glass ball.


We also covered empty, wooden spools with sheet music and embellished them with glitter and pearls for our tree.


To tie the whole look together I made a tree topper using more vintage sheet music and a leftover, woooden star.


We set the Christmas tree in a fancy, silver urn and covered the base with burlap.  We were planning on making this our raffle tree, but we never got around to doing the raffle, so we have been selling the ornaments off one-by-one. 

This was a very inexpensive way to decorate a Christmas tree.  We already had most of the supplies and we had such a fun time making all the ornaments.


This post is linked to the parties on my sidebar.

Monday, December 12, 2011

Vintage Sheet Music Wreaths


I found a whole book of vintage, Beethoven, sheet music at my local thrift shop for $1!  I pulled it out just in time for Christmas decorating and created a couple sheet music, paper wreaths.


I love the natural, aged patina of this old sheet music. 


Sheet music wreaths are such an inexpensive way to dress up your holiday decor and you can add your own decorative touch to each one.  I used some pretty, cream ribbon to attacha bow to the top of this one.  The tiny star in the center is from a pack of wooden stars I bought at the craft store.  I stamped it with a fancy script stamp and then put glitter on the edges. 


I started out by using white glue, but found that it was much easier and faster to just use a hot melt glue gun for the whole thing.


Here is another version of the sheet music wreath.  I attached a wide, burlap ribbon as a wreath hanger for this one.


I attached two wooden stars to the center using the hotmelt glue gun. I covered the larger star with silver glitter and stamped the smaller star with the fancy script stamp.


These sheet music wreaths were fast, simple and fun to make! They have the added bonus of lasting year after year.  I already sold both of these wreaths at Loot, so I need to find time to make a few more.


This post is linked to the parties in my sidebar.

Tuesday, November 29, 2011

Tutorial Tuesday: Preserved, Mini Boxwood Wreaths


We have huge boxwood shrubs in front of our house and I have been wanting to try preserving some for months now.  I finally got around to this project!  I told Mr. Rubbish to stop trimming the boxwoods, so they would get tall and bushy.  This made it easy to find nice branches to preserve. 

Preserving is actually quite easy to do.  First, buy glycerin, which you can find at most drugstores.  The day I went to buy mine they were having a buy one, get one free deal, so it worked out perfect!  I still have the other bottle and I am going to trim and start preserving more branches tomorrow. 

Once you have your bottle of glycerin, you are going to make a mixture of 1 part glycerin and 2 parts water.  Heat the water and then stir in the glycerin.  Pour the mixture into a container (I used two large vases) that will hold the boxwood branches while they preserve.  While the mixture is still warm, place the branch ends in the solution 3-4 inches deep.  Place the boxwood branches in the glycerin and water right after you cut them. Some experts say to smash the ends of each branch with a hammer to facilitate the process of the stem sucking up the mixture. I thought this step was too time consuming and my branches preserved just fine without the added step.  

Now, the fun part: waiting 2 to 6 weeks for the branches to be fully preserved.  You will know the boxwood foliage is preserved when it turns a pretty golden color and the leaves still have the shiny, pliable texture.  I think I left mine in the solution for about 4 weeks, but I am not the best at keeping track of time, so it could have been more or less than that. 

Once preserved, the foliage should last indefinitely!


Since the boxwood branches turned golden (see the front branch in photo above), I used spray paint to make them green again.  This is special paint that Nancy got from a floral shop, although I think I have seen this brand at the craft store too.  I also read that you can keep the foliage green by adding green food coloring to the mixture. 


Here is a pile of preserved and painted branches ready to be made into a wreath.


I used heavy gauge wire and electrical tape to make a mini wreath form.  Then I used green, floral wire to attach one branch at a time around the frame until my wreath looked full and pretty. Using 6 fl.oz. of glycerin with 12 fl.oz. of water, I hade enough boxwood branches to make four mini wreaths.


I tied ribbon around the wreaths and hung one on my hutch at Loot.


Notice how the preserved leaves look shiny and healthy!  It really looks like a live boxwood wreath, but has the added benefit of lasting forever.

I like the Moss Green color of spray paint I used because it looks very similar to the natural color of boxwood.  Sometimes the commercially preserved boxwoods that you can buy at the stores, look too unnaturally, bright green.


I got these mini wreaths done just in time for our Christmas decorating at Loot, but I think boxwood wreaths are not just for the holiday season.  They are perfect for hanging in front of mirrors or windows all year long.


I used some dainty, brown and white striped ribbon on this wreath.


I love them hung in pairs too! They really dress up Nancy's beautiful armoire at Loot.


The mini boxwood wreath adds an elegant touch to any home decor. 


This post is linked to the parties on my sidebar.

Monday, October 10, 2011

Halloween "Boo" Banner and Stencil Giveaway Winner

I am happy to announce the winner of my stencil giveaway tonight!  

I used the random number generator...

...and the winner is:  lucky #7 from Ruffles and Relics.  Congratulations!

Thank you, Maison de Stencils for offering this giveaway and to everyone that entered.  I wish you all could have won!


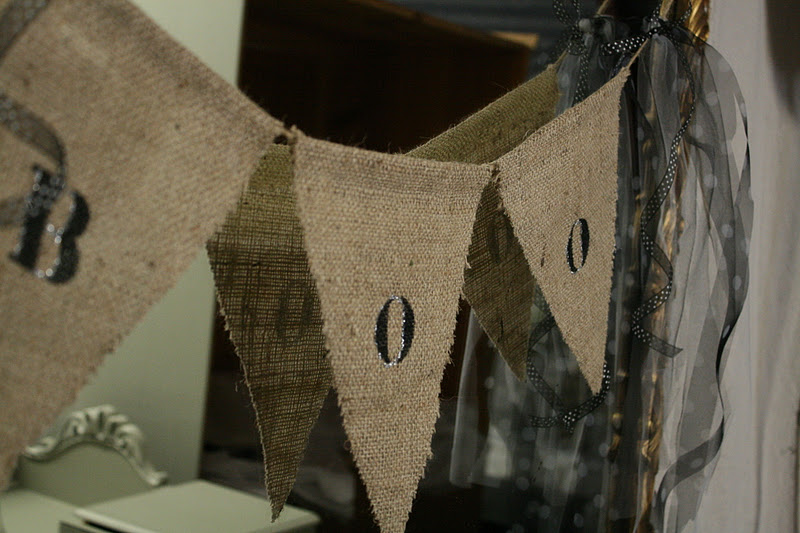
Nancy and I have started having craft night once a week to make items for the shop.  Last week we made some "Boo" banners for our October sale this coming weekend.  

Our sale is October 15th-16th at 3011 Main St. in downtown Soquel.  We are working on getting the whole shop decked out for Halloween.  I am looking forward to showing you all the pictures after this weekend!  If you live in the area, stop in for a "spell".


We cut the banner out of burlap and used my vintage brass stencils for the lettering.


We decorated the sides of the banner with strips of black and white tulle mixed with polka-dot, ribbons.


I am saving most of them for the shop, but I am going to put this boo-tiful banner in my etsy shop!


This post is linked to the parties on my sidebar.

LinkWithin

Related Posts with Thumbnails