Showing posts with label wire basket. Show all posts

Thursday, June 16, 2011

French Country Baskets


I love baskets; wooden baskets, wire baskets, all kinds of baskets!  


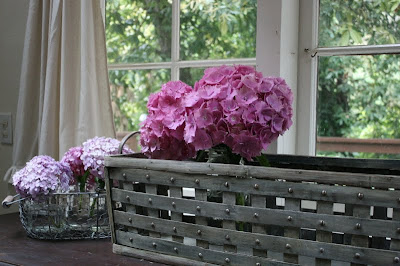
I found this dark, wooden basket at a garage sale for $5.  It is a nice, large basket and I think the little, metal grommets add so much character to its unique style.  I thought it would look fabulous in an aged, French country style.  I started by whitewashing the basket with white paint thinned with water, wiping off the excess with a rag.  This is what it looked like after the whitewash treatment.


Next, I gave it a coat of Ralph Lauren's glaze in smoke color, which gave the basket a weathered gray patina.  I suppose I should call this technique graywashing.


This wire basket also came from a yard sale and only cost $1.  This photo is not very good at showing the color of the basket before.  It was actually dark black with kind of orange-colored wood handles.


I wanted to create another French country style basket with muted colors, so I applied the same treatment as I did to the other basket.  It really toned down the basket and gave it an antiqued look.


I love the way the handles look after being "graywashed".


Ahhh...Don't you love hydrangeas?  Each flower is like a hundred tiny flowers all held together in one large, magnificent bloom.


This post is linked to:


Wednesday, August 25, 2010

Mid-week Design Inspiration: Wire Baskets

Yesterday I mentioned that I love wire baskets and vintage locker baskets. Today I decided to find some inspiration photos of storage solutions using metal baskets.

This kitchen, featured in Country Home magazine, is so charming and bright! I like the open shelving above the counter, the skirted sink and the metal industrial baskets on the lower shelving.


My kitchen also has open shelving, both above and below the counter and I think it is functional and charming. I am currently looking for fabric to make a skirt for the lower shelves in my kitchen. When my sister was visiting me this month we decided that it would be really cheap to build a kitchen with this kind of open shelving instead of cabinets. Just a thought for anyone wanting to build or remodel a kitchen on a tight budget.


This kitchen, featured in Country Living magazine shows an entire wall of locker baskets set on industrial shelving. What a unique storage idea!


The bright colored ribbons displayed in the three-tiered wire basket make this craft room bright and cheery.


Photo from Better Homes and Gardens magazine.


This is the craft room/office I want. I like the mult-colored wire baskets and the hanging baskets. I also love the painted, caned chair and aqua desk.


Photo from Country Living magazine.

Vintage locker baskets can be expensive now days, but I like the challenge of finding them in other people's rubbish. I just picked up a cute one last weekend at a garage sale for fifty cents. The guy was trying to sell the hinges inside the basket and was surprised I even wanted it. The old saying is true: "One man's trash is another man's treasure".

Tuesday, August 24, 2010

Tutorial Tuesday: Burlap Basket Liner

I picked up two, large wire baskets at a garagle sale for fifty cents each. Living in a small home has made me appreciate creative storage solutions. I love the look of vintage locker baskets and industrial, wire baskets on shelves. These two wire baskets are not, however, in those categories and would look better hidden away in a closet or under a bed. I had to do something to bring these boring storage baskets out of hiding.


I decided to use burlap because the baskets are large and burlap is inexpensive at $3-$6/yard. I also happen to like burlap and since I cannot afford linen (unless I get lucky enough to find it at an estate sale), this is the next best thing.

This is how you can make a basket liner of your own:
First, measure the four sides and bottom of the basket adding 1" to each side for the seam and four inches for the top of the sides that will fold over. After cutting out the fabric according to the measurements and seam allowances, hem all four sides of each piece. Then, lay the pieces in the basket and pin them together. When you take it out of the basket, it should retain its shape being held together by the pins. Next, sew all the sides together removing the pins as you go. Before placing the liner in the basket, iron a crease where it will fold over to make it lay flat.


I was just going to leave it like this and possibly stencil on the burlap, but it looked a little plain and still boring. So....I did what I always do in this situation - I added a ruffle! I used vintage pillowcases to make the ruffles. The thing I love most about using vintage cotton sheets and pillowcases, is that I can tear it instead of cutting. This makes it much faster and the strips of fabric come out straighter than if I were cutting. Continuing the tutorial....Next, rip several strips of fabric for the ruffles. The total length of the fabric strips needs to add up to twice the perimeter of the basket because you are going to be gathering it. To make the ruffle, sew a straight stitch, the length of the fabric strip, about 1/2" from one side. I left the other edge of the ruffle raw because, let's be honest, that would be too much sewing. Besides, I think the raw edge fits with the rustic quality of the burlap fabric.


Oh, and if you have a cat, you might want to lock him in another room. Whenever I try to lay out my fabric for cutting, my kitty, Beau, likes to tangle himself up in it and then scratch me when I try to get it away from him.


I don't get it! Everything is a game to him or something :)


The last step is sewing the ruffle to the underside of the burlap.


No more hiding under the bed. Here they are on top of my armoire.

LinkWithin

Related Posts with Thumbnails