Showing posts with label crowns. Show all posts

Monday, November 28, 2011

Burlap and Graphite Chair


 Last month, I won this little, ladder-back chair at an auction for two dollars.  After fixing up sets of chairs, it is refreshing to paint a single chair.  I always feel exhausted by the time I paint, wax and upholster a whole set of dining chairs!


 This was an easy project.  I started by removing the torn seat cusion and then painted directly over the rough, orange-brown stain with Graphite Chalk Paint. The Chalk Paint did a wonderful job of masking the uneven finish beneath it, not requiring any pre-sanding on my part.


After the Graphite paint dried, I sanded it all over, so that it was completely smooth and nicely worn along the edges.  Then, I waxed the chair with a mixture of  Fiddes & Sons clear and rugger brown waxes.


I chose burlap to reupholster the seat cushion because I wanted to keep the chair simple and nothing says simple like burlap.  I used my favorite stencil from Maison de Stencils, which is the same one I used on my slipcovered parson chairs


This post is linked to the parties on my sidebar.

Thursday, September 29, 2011

Stenciled Slipcovers for Parsons Chairs and Stencil Giveaway!


I had a pair of Parsons Dining Chairs from my old house that I wanted to get rid of.  I decided to make slipcovers for them and sell them at Loot.  Laura from Maison De Stencils sent me a stencil as a gift and this seemed like the perfect project for my new stencil.  Maison De Stencils have the most unique and stylish stencil designs.  Laura is also offering one of my reader's a 12 x 12 stencil of their choice.  Keep reading for all the details!


Luckily I had the old slipcovers, so I disassembled them to use as a pattern for my new slipcovers.  I used painter's drop cloth as the fabric.  Once I cut out the pieces, I pinned the top, back and seat pieces together.


I folded the corners and pinned them in place before sewing.


I sewed the front and back pieces together first and then sewed the seat on.  Last, I pinned and sewed the skirt, pleated at each corner. 


Next came the fun part; using my new stencil!  I mixed my brown fabric paint with white to tone it down a little.  The stencils from Maison De Stencils are so easy to use and the designs came out perfect and clear.


Isn't this stencil beautiful?  The stencil really dresses up these, otherwise plain, slipcovers.


These parsons chairs look fabulous on either side of a buffet.


They also work perfectly as two end chairs at a dining table.


I have never made a slipcover for a chair before and they were definitely a challenge for me to sew.  I even broke my seam ripper at one point and had to run out and buy another one half-way through this project.  The second chair was easier than the first because I avoided all the mistakes I made the first time.  I can tell you that it was a big relief when I finally finished them and took them to the shop.


To see other projects I have done with stencils from Maison De Stencils click on the links below:

Now, on to the giveaway, so you can make your own lovely, stenciled project!  

Please follow these rules to enter the stencil giveaway.

1. Become a follower of my blog
2. Go to Maison De Stencil's website and pick out your favorite 12 x 12 stencil.
3. Leave me a comment telling me which 12 x 12 stencil you want, if you win.
4.  For a second entry, post this giveaway on your blog. Leave me another comment letting me know you did this.
5. For a third entry, post this giveaway on your facebook page.  Leave me separate comment for this too.

Good luck, lovely blog readers!  I will be picking a winner, using the random number generator, on Oct. 10th.  


This post is linked to the amazing parties in my sidebar.

Wednesday, August 3, 2011

Paris Gray Pedestal Side Table


I picked up this small, vintage side table at a yard sale a while ago.  It was an orange-brown color when I found it with a small hole drilled in the center. I really like the turned pedestal base on this petite table.


After filling the hole with wood filler, I gave it two coats of Paris Gray Chalk Paint.  Yes, I am still loving the Chalk Paint!  I already need to order more Old White and Country Gray.  I guess I will be using the Paris Gray and Duck Egg Blue a lot until I get enough money for a new order.


After painting the table, I realized that it looked too plain and it needed something to dress it up.  I found an image on the internet, printed it and resized it with my copier. I used tracing paper to trace the design on top of the table and then filled in the traced design with a white paint pen.  I really love using the tracing paper and the paint pens.  They make it so easy! 

 I used a stylus pen to trace the design through the tracing paper.  For those of you that don't know, I stylus pen is an instrument with a metal tip that has a tiny metal ball on the end.  I went to the art supply store to find one and the man working there told me they did not carry them and he snidely remarked,  "Who uses those anymore?!".  Well, I looked around and happened to find them down one of the aisles.  I saw him when I was checking out and I held it up and said, "look what I found"!  He was not amused, did not say a word, and walked away.  I was just trying to help him learn about his inventory. What is up with customer service these days!?


I lightly distressed the whole thing including the design and finished the table with a coat of clear wax.  


Tuesday, December 28, 2010

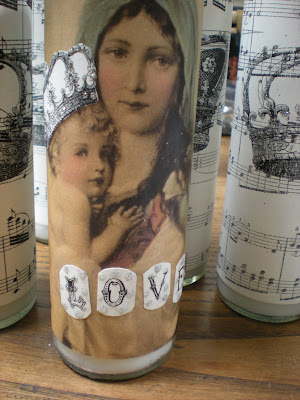
Crowns, Jewels and Sheet Music


I bought more of these tall candles from the grocery store that I decorated for Christmas. I could not pass up this $1.50 candle sale! This time I copied my vintage sheet music onto cardstock and then printed crown clipart, from The Graphics Fairy, over the music. I used modge podge to wrap the paper around the candles and then added glitter paint to accent the crown details.


I used a copy of this vintage print for another candle. I altered it by adding a mini crown and lettering.


The last two candles were the ones I had already covered in brown, vintage sheet music for Christmas. I took off the Christmas greens and added burlap and vintage, pearl earrings to dress them up.


This post is linked to:


LinkWithin

Related Posts with Thumbnails