Friday, September 17, 2010

Vintage Artichoke Lamp

I picked up this statuesque, artichoke lamp at a thrift store in Orange County while visiting my Aunt. I was shopping there awhile and when I got up to the register, they informed me that everything in the store was 50%! I could not believe it and immediately went back to continue shopping. This lamp had a $6 price tag, so it ended up being only $3. It was my lucky day!


This was an easy makeover because all I really had to do was primer and paint. Unfortunately, the lamp met with an unexpected accident while I was vacuuming my living room. I, inadvertently, sucked up the lamp cord with the vacuum attachment and, while trying to pull the cord out, I knocked it over on the hard floor cracking it in half. Luckily, I had some E600 glue in my tool box and was able to glue it back together almost as good as new. I painted it a creamy white with no distressing.


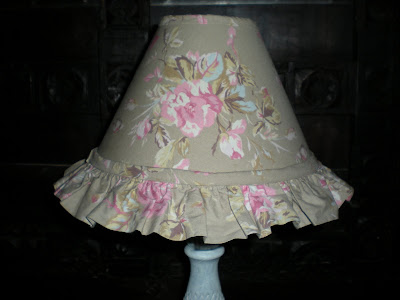
I had an extra lamp shade at the shop that I made for this lamp. The other lamp sold, but I had still had the shade, so It worked out perfectly.

Thursday, September 16, 2010

Pretty in Gray

I recently painted a few of my things gray and cannot believe what an improvement a simple color change can create.

I found this plaster fruit bowl urn at DI for a couple of dollars. It was a cream color and it was dirty and chipped. I gave it a fresh coat of primer and then painted it gray.


Before


After


At the same DI, I found these cherub & swag shelves that had been painted bright gold. I painted them gray and then glazed and distressed the surface.

Before


After


This small cherub wall plaque was 50 cents at a garage sale and I painted it gray too.

Before


After


Last, but not least, is this small gold lamp base that I purchased at a yard sale for $1. It wasn't much to look at when it was gold, but now it is pretty in gray.


Before


After


This post is linked to:

Monday, September 13, 2010

Lamp Shades & Cabbage Roses

One of my favorite hobbies is recovering old lampshades. They are easy to do. A little time consuming, yes, but well worth the effort. I covered these lampshades with whimsical, cabbage rose fabrics that I have collected along the way.

This pale pink, rose fabric is actually a vintage sheet from a yard sale. The woman I bought it from said she had a top and bottom sheet, but all that was out was the bottom. I waited for her to dig through her garage because I wanted more of this beautiful print, but alas, she could not find it. It is hard to see on the small lampshades, but the sheet has big bunches of roses that are connected by delicate rose swags. I made curtains for my kitchen with the sheet and used the leftover part to cover the lamp shades.

The plain, white shades were transformed into these romantic, cottage style shades with an old sheet and a hot melt glue gun.

These both sold at the shop recently and, I have to admit, I was a little sad to see them go.


The fabric I chose for the next shade has red, pink and white cabbage roses on a buttery, cream background. I love this fabric too and I have A LOT of it. My sister gave me yards of it when she moved and was cleaning out her craft room. I have never seen anyone hoard as much fabric as my sister and we had a lot of fun looking through all of it. I recovered this large, rectangular lampshade that I found for $2 at a yard sale.

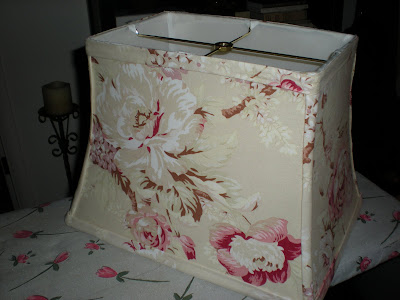


I regret not taking a photo of this lampshade lit up, before it sold, because it looked so pretty with the light shining through it.


I recovered the most recent two lampshades in my sister-in-law's old pillow shams. Does this look familiar Kylee? The fabric has a light brown background with pretty pink and white roses. I used the ruffle that was already on the edges of the sham for the shades to make it easier on myself.


This post is linked to Make it 4 Monday at Cottage Instincts, It's so Very Creative at Its so Very Cheri, Show me How at It's a Blog Party, Made by You Monday at Skip to my Lou, Metamorphosis Monday at Between Naps on the Porch, The DIY Showoff, and Saturday Nite Special at Funky Junk Interiors.
Click on the links for more great ideas!

Friday, September 10, 2010

Vintage Brass Stencil Letters & Numbers


I went to a yard sale, a while back, advertised on Craigslist. The ad said they were ex-crafters, so I knew it would be a good one. This ended up being my first and last yard sale of the day. I spent a long time looking through immense amounts of fabrics and craft supplies. I spent all my garage sale money for the weekend at this one sale! One of my favorite finds of the day were these vintage brass stencils. I got a full set of numbers and letters in their original boxes and some miscellaneous numbers and letters in a third box. I paid only $2 for all of them!


I used the brass letters to stencil this little mail box for a desk or a wall. I painted it gray, stenciled the letters in black and then sanded the whole thing for an aged look.


This post is linked to Fabulous Friday Finds at Frou Frou Decor, Frugal Friday at The Shabby Nest, Flaunt it Friday at Chic on a Shoestring Decorating and Showoff Sunday Party at House of Thrifty Decor. Click on the links for more great ideas!

LinkWithin

Related Posts with Thumbnails