Monday, January 31, 2011

Simple Painted Terra Cotta Pot

I have been quite busy the last couple of weeks and have not had time to work on any of my projects.  I did have time to tone down one of my favorite terra cotta pots.  I found this pot for $1 and, of course, I loved the galvanized metal trim at the top.


 I was just not crazy about the metal paired with the bold terra cotta pot, so, after taping off the metal trim, I watered down some gray paint and brushed it on the pot.  Then, I stenciled a simple fleur de lis in a darker shade of gray.


I have a list of projects waiting for their turn to be reloved, so I should be back to posting regularly as soon as I can get caught up!

Monday, January 24, 2011

Charcoal Art and Handmade Books

My cousin, Brittany Wood, is an amazingly talented artist and photographer and she just opened her first Etsy shop.  She freehand draws these beautiful, charcoal drawings.


Aren't these fashionistas gorgeous? They would look fabulous with black frames to add a little wall candy to any space!  She also does custom, personalized charcoal drawings from photographs.


Brittany makes books completely by hand too.  This one is my favorite with the leather binding and the beautiful Japanese paper.


This damask print book with whales is adorable too.


Check out Brittany's Etsy shop by clicking here.

Thursday, January 20, 2011

Facelift for an Old Clock


I was visiting my little brother a couple of months ago and he had this old clock on his wall.  I told him that I liked his clock, but it needed a little fix-up.  He took the clock off the wall and handed it to me.  I love a challenge!

This is what the clock looked like before.  It was that '70s, orange-brown stained wood with gold swirly designs on the glass.  Even with the ugly accents, I loved the beautiful shape of the clock.


I started by removing the ugly gold, curly cues from the glass with vinegar and a razor blade.  They came right off!  I would have painted the clock a weathered gray, like this coffee table, if it was for myself.  Since it was for my brother, I decided to paint it black and distress the edges.


After I painted it, it still need something else and I decided a new face would complete the transformation.  I turned to my friend, Renee, from Shabby, Chic & Charming.  She has a lovely blog with so many creative ideas and I remembered she beautifully transformed one of her clocks by designing a new face. You can see her transformed clock by clicking here.  I asked her if she would design a face for mine too and she did an amazing job!  I love the Roman numerals and the distressing she added with her graphics program.

 I wanted to customize it for my brother, so I asked Renee to add Sherman (his last name) clock company at the top.  She also picked a lovely, yet masculine graphic of a lion and unicorn, that looks like a family crest, for the bottom.  I love it!


I printed the face out at Staples on white card stock and then added some smoke colored glaze for more depth.


I cut it out and used Modge Podge to decoupage the new face over the old one.


I hope my brother likes his clock facelift!


This post is linked to: 


Monday, January 17, 2011

Stenciled Galvanized Bucket


I had a couple of old, galvanized buckets lying around and I have been wanting to make them over for a while.  My house number is five and I put this bucket on my front porch.  I originally had planned to stencil this one and put a mini pine tree in it to add some decoration to my porch for Christmas.  Unfortunately, I just never got to it in time for Christmas.

I started by cleaning up this old, galvanized metal bucket.


I love these little boxwood, topiary trees and their little pots, but they were badly root bound and in need of a transplant.  I transplanted one of them into a large plastic liner and put it inside the galvanized bucket.  I covered the top with moss to hide the liner.  


I already had the wreath stencil that I made for this project.  I just cut out a new stencil for the No. 5. 


The tree might be a little small for this bucket, but it will grow and I can always switch it out because it is not planted directly in the bucket.


This post is linked to:


Friday, January 14, 2011

Paris Junk Box


I found a sturdy, large box, about double the size of a shoe box, at an estate sale for 50 cents.  I am always looking for additional creative storage solutions for my tiny house and this box is a perfect addition.


I printed tons of black and white clipart from The Graphics Fairy and got ready to decoupage! There are so many amazing graphics to choose from on this site, but I settled on all black and white because I do not own a color printer.  I printed old, French postcards, scripts and embellishments on creamy card stock and vintage book pages.


This is what I started with - an ugly, but sturdy Christmas box.


I printed some of the labels on my vintage book pages.

I painted the backside of all the pages with Modge Podge and then pressed them onto the box to make a collage.  I finished by painting a thin coat of Modge Podge over the entire surface to protect it.


This post is linked to:


Friday, January 7, 2011

Linen and Ruffle Lamp Shades

I have an obsession with recovering lamp shades and I seem to find them in need of recovering everywhere I look.  I sometimes wish I could pass them up because it is a time consuming project.  I covered this plain, white shade in a pale rose fabric and added a ruffle trim.  This is my favorite lamp shade so far.  I love the gentle scalloped edge on the bottom of the shade with the ruffle trim.  I was going to sell this one at Blessings Boutique, but I love it too much!  


Now I need to find the perfect lamp redo to go with this shade.  Isn't this subtle fabric beautiful with the light shining through it?  


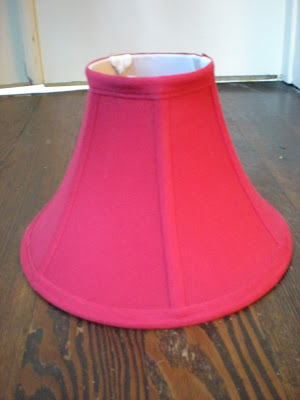
The other lamp shade, I finished yesterday, was a $1 garage sale find and started out bright red.  While it was in perfect condition,  I am just not that into red.


I ripped and cut the red fabric off of the lamp shade frame, while still leaving the liner intact.


I covered the frame in some pretty white linen, covered up the seams and added a raw edged ruffle to the bottom.


I put the shade on a $2 thrift store lamp and moved them both out of my to do pile and into the shop!


This post is linked to:


LinkWithin

Related Posts with Thumbnails