Sunday, November 28, 2010

Cottage Gray Coffee Table

I hope you all had a lovely Thanksgiving holiday! Black Friday definitely worked to my advantage this year. I got a voicemail from Blessings Boutique this weekend saying that my space was nearly empty! I secretly hoped to get a phone call like this someday!

Now I am under pressure to finish my projects that are laying around at various stages of completion. We got back home from my parent's house late last night and this morning I got right to work on my quest to refill my space at the shop. I found this vintage, pedestal coffee table at a yard sale, a couple of weeks ago, for only $3! The table is solid wood and I love the pedestal base with the curved legs.


Before

The top was scratched and the stain was worn off in places. I used my palm sander to remove all the old stain and prepare the table for its new look.


After Sanding

I wanted to try something different with this table. I mixed my gray paint 50/50 with water to make it like a thin stain. I painted it on and rubbed the paint into the wood with a lint free rag. After it dried, I painted on Ralph Lauren's glaze in smoke color and rubbed most of it off with another clean rag.


I love how the finish came out with the dark wood showing through in places. It will be perfect in a French, country cottage now!


This post is linked to:


Wednesday, November 24, 2010

Happy Thanksgiving!

We have had several days of consecutive rain here on the Central Coast and I was happy to see the sun sparkling brilliantly through the trees this morning. I wanted to get outside and enjoy the crisp fall air! I got bundled up, because it was really crisp outside, and took my kitty, Beau, on a nature hike. Beau loves going on walks around the property and especially down to the creek behind our house. I brought my little, wire basket and filled it up with autumn treasures. I gathered pinecones, fall leaves, acorns, rocks and moss-covered branches to create a Thanksgiving vignette!


This gorgeous, pale green pumpkin, with the tendrils, came from my neighbor's farm. Isn't it a beauty? Tomorrow it will become pumpkin cheesecake, so I wanted to capture its perfection before I cut it open!


I hope you all have a wonderful Thanksgiving and share a delicious feast with cherished family and friends!


Monday, November 22, 2010

Songbirds

I was inspired by Renee at Shabby, Chic & Charming wth her adorable burlap, bird Christmas ornaments. You should check out her blog and see all of her beautiful projects.

I created my own bird ornaments using a small piece of cardboard, that came with a lamp kit, and more vintage sheet music.


Here is the piece of cardboard that the birds started as. I am not sure why I am including this photo...maybe just to show that even a piece of rubbish like this can become something beautiful with a little imagination!


I drew the bird shapes on the cardboard and then cut them out and used Modge Podge to decoupage the sheet music to the front and back of the cardboard. I attached a delicate gold thread and shredded the wings and tail feathers.


My sweet sister, Emily, gave me these ceramic, bird ornaments a few months ago. My whole family loves garage sales and they are always finding things for me that they think I can fix up. Well, I finally transformed these little birdies in time for Christmas.


I painted them a creamy white and sprinkled them with white and gold glitter.


Here are all the birdies together in a tree!


I know I have been doing a lot of little Christmas decoration posts, but that is what I have been busily working on. I promise to have more big projects coming up! I am going to be starting my first upholstery attempt with two antique chairs over the Thanksgiving holiday. Wish me luck!


Friday, November 19, 2010

Vintage Sheet Music Ornament


I love all this vintage sheet music I found at a yard sale last weekend. I have made my first project with it - a triple star, dangly ornament. I found this ordinary ornament at a yard sale for 50 cents and I transformed it with a little sheet music and glitter. I traced the stars onto the sheet music and then cut them out and used Modge Podge to adhere it to the stars. After it dried, I painted Modge Podge on the edges of the stars and sprinkled them with gold glitter.


As I was digging through the sheet music, I found this old, vintage print of Mary holding baby Jesus. Isn't it beautiful? I love the subdued colors of the print with their pink, rosy cheeks. I just happened to have a vintage frame laying around that fit it perfectly. I want to keep the original print, but I made a copy to sell in my space at Blessings Boutique for Christmas.


This post is linked to:

Tuesday, November 16, 2010

Tutorial Tuesday: Noel Christmas Banner


I have been going over and over in my head different ideas for Christmas banners. This is the first one I have created and I cannot wait to make more! It was fun, easy and I love how it turned out. I played around with a few different fabric choices from my fabric bin and finally settled on burlap mixed with this cherished, (I have been saving it because I only have about a yard) sheet music fabric from my sister.

Let's get started!

First, I made some patterns of the basic shapes from newspaper.


Then, I pinned the patterns to the fabrics and cut the shapes out. I pressed all the pieces and ironed a half-inch flap on the flag for later.


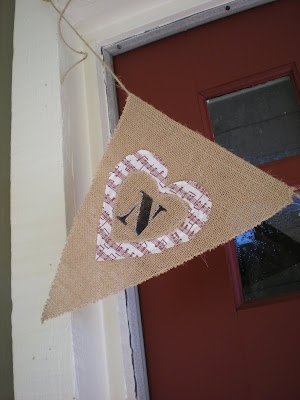
Next, I stenciled the letters on the little burlap hearts using my vintage brass stencils and black fabric paint. I embellished the letters a bit with a tube of glitter paint. If you do not have brass stencils laying around, you can print clipart and cut out stencils like I did for this number project.


After the paint dried, I pinned the burlap heart to the larger sheet music heart and sewed it on with a small zigzag stitch (my first attempt at applique).


I also sewed the edges of the burlap flags with a zigzag stitch because burlap tends to fray excessively. I, then, attached the hearts to the burlap flag by sewing a straight stitch all the way around the sheet music heart.


I used hemp twine and connected the burlap flags by folding, the already pressed, flaps over the twine and pinning it in place, removing the pins as I sewed. The flags are adjustable and can easily slide along the twine.


I love the musical fabric and, on a side note, I found stacks of really, really old sheet music at a garage sale over the weekend in Orange county. I had to pay a whole 50 cents, but it was worth it...heehee. I am trying to decide what I want to use it for first....so many projects, so little time!


Joyeux Noel!

This post is linked to:


Monday, November 15, 2010

Aunt Susan's Treasures

Over the long weekend, I had an appointment down in Orange county and while I was there, I stopped by to see my Aunt Susan. Her house and garden are full of beautiful treasures and antiques making her home warm and inviting. Her personality is as lovely as her home, so it is always a wonderful place to visit.

I love how she transformed her Southern California tract home into a magical cottage! I want to share some photos with you that capture Aunt Susan's charming home.


Surrounding her front yard is an adorable, white pickett fence with an entrance through a little gate under an arched trellis.


Front Yard

Her front yard is lushly landscaped and accented with birdbaths and statues. I love the fair maiden in the rose garden and the iron arched trellis coverd in rose vines.


Here is my beautiful Aunt greeting us at her front door. Come on in!

But first, let's take another look at that gorgeous front door! Aunt Susan salvaged it from an old house that was being torn down in Newport Beach. The glass is amazingly beautiful and I love how it opens half-way.


Inside


Inside the house is full of antiques including this gorgeous antique fireplace mantle. I adore the antique mirrored, armoire and little desk and chair too!

backyard
Her backyard is full of citrus trees, flowers, fountains and winding pathways. Aunt Susan laid the brick pathways all by herself! She also built the little cottage in the backyard that is actually a chicken coop. She is a talented lady!

I hope you enjoyed this inspiring tour of Aunt Susan's cottage!


LinkWithin

Related Posts with Thumbnails